Pages

Monday, September 24, 2012

Fall Mantle Decor

More about fall. Sigh. Decorating this year has been so fun being in the new house. I love finding new places for decor, I want things to look a little different every year by mixing the items. Tonight I want to show our mantle decor for the fall. I posted about our fireplace and mantle a month ago and raved about how much I love it. While I loved the decor that was up before, I wanted to change it a little for the fall. This is what it looked like before:


Sigh. I kept the window and garland up because they are pretty neutral (really, the garland reminds me of fall/Halloween because it is coffee-stained papers. something about that seems creepy...?), but changed out the end pieces. The birds and the topiary cage went into hiding for now. I had a wicker pumpkin I scored at the Dollar Spot from Target last year to go on the mantle for some fall inspiration.


And for the other side I used an antique jar (not a Mason! what?!) and put candy corn and a white candle inside. Although I personally do not really like candy corn, they are fun to decorate with because the colors are definitely a reminder of fall, and they are whimsical! Funny note- last night we had the high school boys bible study over and they wanted to eat them. The hubs started to let them but then told them they couldn't because I would notice if any were missing. I don't know about that... but I did notice that the jar had been slightly moved. :)

 
Recently I posted about the height issues with the topiaries on the console table, and this is where they found their way to! Since the pumpkin and jar are short and round, the topiaries provide the perfect contrast in height! Yay! I was so excited they got to stay out!


We have a chair next to the fireplace where it is nice to relax and cozy up when there is a fire (the one time that has happened so far).
 

But behind the chair there is a ledge between the living and dining room. I also switched up the decor on the ledge for fall. I used the trophy vase that was on the mantle before and filled it with pine cones. Pine cones are great to use to decorate for fall because they are easy (throw them in a cool bowl, vase, hurricane, etc. ) and inexpensive.


My roomie Katie brought out a cute little tray she painted with chalkboard paint and wrote a fun fall message.


Yes, we live in Texas. I say y'all often. So this is perfect. :)

To top it off, the hubs brought out my fave Halloween decoration this weekend because he was feeling bad for me having to work on Saturday and then do so much homework. Meet Halloween Snoopy. I actually took him from my mom's house years ago because I loved it so much.

He plays the Charlie Brown theme song when you push his hand, and the crystal ball flashes and he bounces up and down. It is a classic in my life.... just ask all my previous roomies. I don't know if they liked him as much as I do. :)

Regardless, fall is officially here and my house is ready!

Have you decorated your mantle for fall? Do you have any traditional fall or Halloween decorations? 

I will be linking up to:
fall mantel party centsational girl

Thursday, September 20, 2012

Dog Silhouettes

We LOVE our dogs. I even talked all about them for a whole post. One day I was perusing Pinterest and came across this:

Silhouette onto encyclopedia paper

I thought this was so great. Our dogs are beautiful.


And yet I felt weird putting pictures of just them up in our home, so this was a way to do that in a unique, vintage, fun way!

The silhouettes are printed on encyclopedia paper. How awesome it that?! So first I went to our local thrift store to get an encyclopedia. The frames I wanted to use were 8x10 so I needed a large encyclopedia. I also wanted to find one that had entries related to the dogs that I could print the silhouette on that would be visible. So I looked through the encyclopedias trying to find pages with words related to dogs where the entries were on the outside edges-- so that when I printed the silhouette it would be visible. You will see what I mean later. :)

Next I took pictures of the dogs. It was difficult to get a profile of them, so the hubs had to hold treats for them to look at while I took the pictures.


I then uploaded them to Photoshop Elements and figured out how to make the background disappear (magic eraser I think) and then made the silhouette image black. Then I did a few practice printing runs so I could get it the right way on the page. I printed Coop's silhouette on a page about a dog and Zoe's on a page with the love entry. The hubs had the awesome idea to put little cardboard initials I had on their respective pictures. And now they look awesome!


 I hung them on either side of our entryway shelf and smile every time I look at them.


Maybe you have a dog... or another animal? and can make this to enjoy! It is such an inexpensive, easy, and unique way to show love for the 4-legged members of our families!


Sunday, September 16, 2012

Fall Home Decor: Entryway Console Table

As I type this, I am sitting in a comfy chair next to our very first fire in our fireplace! And it's September!! It has been raining for a few days now, and the temperature has cooled enough for me to create a fire to cozy up by. Granted, the windows are open. This helps it not to get too warm, but more so that I can hear the constant tinkling of the rain.

September 15 was the day I bargained with the hubs for to decorate for fall. It worked out even better due to the recent weather-- it feels like fall is here to stay! Although we know this won't last much longer, the dreary weather made the fall decorating more enjoyable. I'm going to show you the transformation of our home for fall in segments so that it is not one long post-- so I don't feel bad about writing a lot! :)

I didn't have much in my "Fall/Halloween" decor box. When I got it down from the attic, I was able to drag it down the ladder myself- that's how light it was. But, I looked at fall decorating differently this year, had a few ideas planned from Pinterest or other blogs, and did minimal shopping. I simply tried to convert pieces I already had for the season by adding small touches to them. This not only saves money, but made me happy because I love a lot of the decor pieces in our home, especially the vintage, comfortable feel. I didn't wan to replace them with gaudy, over-colored items that are not my style.

I started by getting out the box of decor I had. I surveyed what was in there and considered what I wanted to do. Then I looked around the house and considered our space. In reality, I didn't need a lot to make it feel more like fall-- no need to go crazy. I wanted it to stay simple, meaning just replacing or altering decor that was already in a space, not making things more cluttered. Like I said, I looked at fall decor differently this year. I wanted a natural, rustic, simple look, to remind us of the outdoors that put on a beautiful show this time of year.

I will start with discussing the console table decor because it is what you see when you first walk in the house. I recently posted about the artificial topiaries that typically adorn the table, but you won't see them here now. I'll explain why later. 


I don't think I have talked much about this table until now. This table is awesome. It was given to us by my husband's step-brother and his at-the-time-gf-now-fiancĂ©e. It was theirs and they no longer had use for it, so gave it to us! Holla! It is a beautiful dark wood with a simple, yet elegant, shape, including slightly concave legs. It has three little drawers that we keep random small things in like batteries, candles, chalk, etc.. In our apartment before this, our microwave sat on the console table in the kitchen-area, but I longed for it to be used for its true purpose, as it is now. 

For the fall decor on the console table, I started with a hurricane I already had and filled it with pinecones (no, we don't have pine trees here, they were bought in-store). I then nestled a white candle on top of the pinecones. I used smaller, thinner pinecones around the candle to fill the rest of the hurricane.


I love the look of this. It feels rustic and natural with the pinecones, but refined by the curves of the glass and cleanliness of the white candle. Perfect.

I originally just removed the frame that was between the topiaries and put the hurricane in its place. But the height of the three were too similar. I like to vary the height when creating a vignette, so I moved the topiaries. Don't worry, you will see them again soon! My roomie Katie and I went shopping, after inventorying and before decorating, for fall decor. I gave myself a budget of $10. Yup, $10. We were going to go to a local second hand store, but it was already closed. So we went to Target. "Target?!" You may say. "No way you can only spend $10 there." In fact, I only spent $5 on fall decor! Last year I had gotten a few things from the Dollar Spot, and hoped to be as fortunate again.

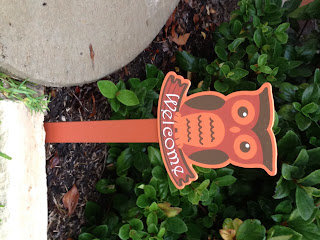
They did not fail us. There were a lot of cute things, many even ended up in my hand basket. But, with consideration to how much I would actually use them (felt napkin rings) and if it would just get covered up (felt placemat used under a centerpiece), we landed on two owl lanterns and a picket sign for the front yard.


Whoops! The picket is a little crooked! darn rain...

Out of 4 options, I chose this picket because the bright color is easily visible, it is useful for several months (as opposed to a Thanksgiving-themed one), and it has an owl. I like owls, as this shopping trip shows. Actually, these are my first owl purchases. But you know my love for birds... must be something about the avian line of animals.


At $2.50 each (we each bought one) these lanterns are adorable! Perfect for fall with dark warm metal and an owl di-cut. Adorable! And they are the perfect height to go on either side of the hurricane on the console table.

After I had it all on there, the lanterns looked too dark against the wood of the table. But the height worked so well I took a minute to consider my options. Then I remembered I had some scraps of burlap from other projects, cut a length of the natural tan, and made it a runner. This helped to brighten up the table and make the lanterns more visible, all while maintaining the rustic, natural, fall look I was going for.


Katie had several fall-inspired candles, so I used 2 orange pumpkin-scented ones between the hurricane and lanterns for a bit of color. Now it not only looks great, it smells great too!!


I love the instant burst of fall you get when walking into our home. It perfectly achieved my hopes for the decor-- it is natural, simple, beautiful, and cheap. A gentle reminder of the beautiful season where nature comes alive again with color!


Have you started decorating for fall yet? Where do you get inspiration from? Any great finds when shopping? I would love to hear about it in a comment!


Wednesday, September 12, 2012

For the Love of Garage Sales

At first, garage sale-ing was a necessity. When the hubs and I were engaged, we did not have much money, and we had NO furniture, besides an icky bed. So, most weekends the hubs and I would go out with all the little old ladies in Belton and hit the garage sales. We scored a lot of great things that we still have. Besides our couches and bed, every piece of furniture we owned was from a garage sale, Craigslist, or given to us. It was such a blessing!

It was weird when we actually decided to make a new furniture purchase from the store (a new bed)! The thought of spending THAT MUCH on something was crazy. But of course totally worth it- we no longer get back aches from our bed. In fact, it is so comfy we never want to get out! The dogs love it too!!

(sneak peak of our bedroom! maybe that tour will come soon!)

This is the dogs and me on the bed! They are such good snugglers!


But this is about garage sales, not our bed. We still love to garage sale. Items you can find at garage sales have character. Another great thing is the price - hello! Which is excellent for someone like me who would rather make it work with paint or jute than pay full price at a store.

It is almost the end of garage sale-ing season, since in a few months the weather will start to get cold! So here are a few tips to go take with you to conquer garage sales!

When you spot an item at a garage sale you like, love or are just considering, the first tip is to not show too much emotion. You can show in a subtle way that you like it and are interested, but don't let on that you are attached or have-to-have-it-- that will let the buyer know they control the price. Try to have a poker face. Be nice and polite, but don't shout for joy that you love something!

Inspect the item. Make sure that it is in good working condition. If it is an electronic item, ask to plug it in to make sure it works. Sit on chairs to make sure they are not rickety or weak.... etc. Even if it is cheap, it's not worth spending any money on if it is going to fall apart!

Think about the item in your house. This is something I have to make myself do. Again, even for cute cheap items, if you won't have a place for it, it's not worth buying! Think about the style-- does it match your house? Will it fit somewhere? Do you have to do anything to it to make it work? How much would that cost? If you don't think you can find a place for it, then don't buy it unless you LOVE it, have been wanting one like this, and KNOW you will find a spot for it. 

If you have decided you want to take it home, think about what you are willing to pay for it. If there is a price on it, does it seem fair? It is a good idea to get a price in your mind that you want to offer, and the max you would pay for it. That way, when you get into bargaining, you know when to stop. By having a pre-determined price, you get a realistic price that is not driven by the emotion of "winning" the item, but based on what it is worth to you. And consider bundling items to get an even better price.

So, ready to pay, it is best to walk up to the seller with cash in hand. Be polite, say hi, and you can make a connection with the seller by commenting on the item by saying something like, "this is really unique." Remember to not show how much you like it! Then to get a price, you can either ask, "what will you take for this?" if you think the price is too much, or just give your offer. If the seller wants to bargain, remember your max price, and be willing to walk away. If you give an offer with cash in hand that will help seal the deal!

Let me give you an example!


I spotted a pair of these tall, originally brass candle holders at a garage sale. I love the height and the curves. I knew they would give a great silhouette in a fresh color. I simply whispered to my hubs that I liked them, making sure not to show how much I liked them. I took a closer look at them. They needed cleaning, but otherwise were in good condition. They are level, sturdy, and heavy. Bingo. I was not a fan of the original brass color, so I knew that I could make a simple, easy, cheap change by giving them a few coats of white spray paint. Although when we looked at these we were in out apartment, I knew they would be great in front a a fire place someday soon! :)
They were priced for $10 for the pair. If I remember right, we were at the garage sale a little late in the morning when people get to the point where they want to get rid of stuff and are willing to take lower prices. So, my amazing haggler husband offered $1 each and we took them home!

I gave them some love with some good ol' white spray paint and they look fab! I'm sure candle holders like these would be priced at about $20 each in a retail store. But they only cost me about $5 for both! Awesome. Now that's why I love garage sales!


Sunday, September 9, 2012

Photo Book

Well, I have bronchitis. Or a virus. Either way, I have been in bed minus the doctor since Thursday night. I have watched a lot of HGTV, Harry Potter, and our new Season 8 of the Office. I also got an email from Shutterfly, where I make our photo books, with an offer for a free 8x8 book! Perfect size for a book of our trip to Chicago this summer!

My brother got married this summer a few hours south of Chicago, so we stayed a few extra days to enjoy the Windy City! We were there less than 3 days, but we did a lot! I have "shared" our photo book below so you can take a look at it.

I love making photo books online because it is like scrapbooking, but made for me! It has all kinds of cool things to make the book unique, without having to have a ton of supplies on hand! It makes it fun to look though again and again. Enjoy!

Have you made a shutterfly or other photo book before? What is your favorite part about it?

Click here to view this photo book larger

Create a gorgeous, high quality wedding photo album at Shutterfly.com.

Monday, September 3, 2012

Easy-peasy DIY Artificial Topiary

Want another easy DIY project? Here it is!

I love the look of greens in the home. It brings the outside in, gives a feeling of freshness, life. Well, I have a black thumb. I am not good at keeping plants alive. :( I do fine with fresh cut flowers, but if it has roots and a soil, forget it.

So, for our home, the look of the topiary was perfect. It not only gives the natural look, but it is also very stylish. Topiaries have a distinct shape, which gives it an extra-awesome look! The shape can help to provide dimension and height to a vignette (a grouping of objects for aesthetic pleasure) without being overpowering.

I decided that I wanted two artificial topiaries on the console table in our entry hallway. Places like Pottery Barn, Ballard Designs, and even Overstock want to sell artificial topiaries for at least $35 each. I thought that was crazy, and definitely not in our budget. Plus, I figured that I could make my own!

I had seen topiary forms at Hobby Lobby before, so I started there. At first, I bought the form with two foam spheres, but when I got home with them I realized they were very tall and wide for my space-- and the pots I had bought already.

19" Topiary with Single 4" Green Ball
Photo courtesy of shophobbylobby.com
So I returned those and got the single sphere instead, much more satisfied as the form is shorter and smaller. Perfect. Each form cost $10, but I used 40% off coupons on each, bringing the total to $12 so far.

I have the Hobby Lobby app for my phone, which makes it easy to access the weekly sales and coupon. Note though, often their sale prices- unless it is a big sale- are not as good as using a coupon, especially for the non-seasonal home crafty stuff. If it is on sale, you can't use a coupon.

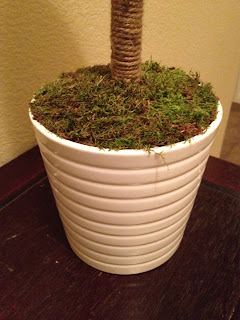
There is a wooden dowel from the base foam to the sphere, which wasn't very pretty. So I wrapped it with jute. I started at the bottom and wrapped around, using hot glue to secure the jute every couple of circles up. I did this first so that the ends would be hidden by the moss. I already had the jute, so we are still at $12!

Photo courtesy of gemplers.com

Next, I cut the base form to fit the pots. I bought these (the first two in the line) pots at Ikea for $2 each--bringing our total so far to $16. I like the clean, crisp white. But, the designs add some flair so that they do not look so plain. I wanted the topiaries to look great without commanding a lot of visual attention.
KARDEMUMMA Plant pot IKEA Lacquered interior; makes the plant pot waterproof.
Photo courtesy of ikea.com
To be honest, I used our serrated bread knife to trim off the excess foam on the base to fit the pots. The base forms originally had a lip to them, which I had to remove for them to fit. Also, I had to trim the edges of the base, under the lip, to fit in the pot which was narrower. I'm sure you could use another tool for this, but this was handy!

After the bases fit, I nestled them into their pots to that the top of the base was flush with the top edge of the pot.


Photo courtesy of shophobbylobby.com

For the moss, I bought a bag of Natural Green Sheet Moss from Hobby Lobby that cost $6, or $3.60 with a coupon. This bag was enough for both topiaries. I still had the hot glue gun on, and so got started! I tried to choose the pieces that were the largest, to make the job easier. (What is so cool about this moss is how it comes in... sheets. Just like the name. :) The sheets are in no way uniform, but it makes the gluing process much easier than the kind you put in the bottom of artificial trees.) I ran the glue gun around the foam and then plunked the moss on that area, filling glue in to any areas I missed under loose moss. Smaller pieces were used once the majority of the foam was covered. I did the same for the foam sphere on top, and trimmed fly-aways with scissors.


 Ah, there are still a few fly-aways. It's cute like that!

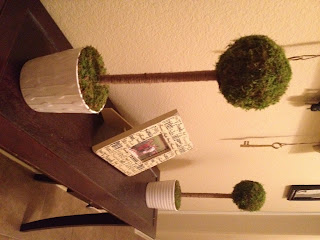
And that's it!!! They turned out awesome!! 


Our total is about $20 for 2!! That saves AT LEAST $50! Now, that's my kind of DIY project. And what makes it even better is that it is easy and doesn't take much time at all! 


This is our console table now, with a photo of us and the roomies between the topiaries! But I think soon, with the coming of fall, I will change up the area between the topiaries. I. Cannot. Wait. :)


Saturday, September 1, 2012

Upcycle Frame to Message Board

I apologize for not having a new blog post sooner. It was a crazy week with work and school. And as my husband reminds me, reading for school is more important than the blog. Boo. I had this post written for over a week, and had started taking pictures a few days ago, but got interrupted by a phone call from work for me to go back in. So, after doing some reading and cleaning today, I was finally able to take the photos for this post! 

I love having decor that says something about who we are or is inspirational. We have a few things like this around the house, and today I want to tell you about one I made myself!

This frame was originally walnut and had a matte that displayed 9 horizontal pictures. I liked that it could hold so many pictures, but it was so plain and.... Blah. I like more creative ways to display our photos. Or at least more interesting frames!


So, I took this idea from.... Pinterest! I removed the matte, glass, and back and spray painted the frame white. I have learned at lot about spray painting over the last year. Temperature of the environment is important! It can't be too hot or cold. Tried that. The cold did some kinda cool things to the paint on a bottle I was working on, though.


Another tip is to use a spray paint gun. This $3 investment saves my finger when painting! Some brands of spray paint have nicer, bigger buttons though which are not only easier to use, but don't even work with the gun. One of the great things about spray paint is that you can basically paint any type of surface (check out the list on the back), and no sanding or priming needed! Just make sure it is clean!!

So after spray painting, I let it dry for a few hours and then sanded it a little on the edges to give it a distressed look.


Now, for the background you have a variety of options: tissue paper, wrapping paper, fabric, maybe even newsprint. The key though is to have something that your marker will show up on top of. So, you might not want a very dark or colorful pattern. I have had this wrapping paper for a while and love it! It works great for this project because of the neutral and subdued colors: I don't have to worry about the marker being visible!


Measure the size of the glass, cut the paper to fit, and use double sided tape to secure to the backing of the frame, so the tape will not be visible.

Replace the glass and backing, and that's it!! Then choose a message for the board and write in DRY ERASE marker on the glass. You could use it for a to-do list, grocery list, calendar, or just to write cool quotes on (like me)!


If you are looking for an easy DIY project, this is it!! And with so many ways to make it unique and display it, it's a great project for anyone!!